
What if we tell you that you do not require expensive, sophisticated equipment to create a video on par with the YouTube videos you watch? I think you already know that. What you don’t know is the how. How can you use simple tools to create a stunning video that people are wowed by?
Today, we teach you five simple steps that drive you onto the path of becoming an amazing film-maker. They are easy to understand and we promise that there really isn’t any expensive equipment involved. It is really more about skills and experience.
- Using a Suitable Camera Setup
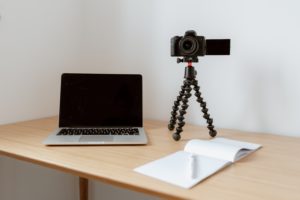
This seems to be the trickiest part for many. The key is choosing the right one for your productions. Depending on what you are filming, the equipment to use should differ.
Surprisingly, do consider your phone’s camera. Not the selfie camera but the rear-camera which are always of a better quality. It is an option to not miss out on especially when you are experimenting and that there are many variables to be switched around. Using what you already own, will make this process less expensive.
If you are filming something adventurous, an action camera will do the trick. While they are in the hundreds, it is still more affordable than the professional cameras used for other genres of films.
You should look out for a camera that provides a resolution of at least 1080p and has a flip screen to see the visuals as the filming begins. Fundamentally, these are the two entry-level requirements for you to get started.
To achieve the level of a professional film, wobbly footage is out of the discussion. A tripod ensures the stability of a camera and hence, helps you to produce proper footage. Although purchasing a proper tripod is a better choice, there are still other alternatives of a stable surface perfect for filming. Minimally, keep your camera steady, be it through a makeshift tripod or a stable surface.
- Creating Optimised Lighting conditions
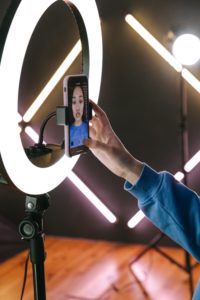
Determine how you want to appear in front of the camera. Consider the shadows, the contrast and how harsh or soft you want it to be. Also, take note of external variables such as the amount of natural light flowing in as you make adjustments to your equipment. While there are professional camera setups which are able to control all the variables for lighting, a ring light for starters works too.
Start small and familiarise yourself with the lighting and how it works first. This will help you get to know exactly what kind of image you want to produce and how you are going to get that lighting.
- Listening with Good Audio Quality
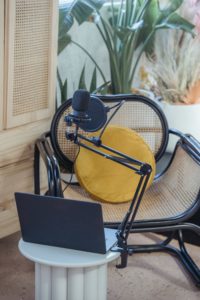
Clear audio is essential to a good quality video. So, choose your filming environment wisely to provide you with a quiet space to film. This allows your voice to be captured properly without the disturbance of background noises or excessive wind. Not to forget, watch out for echoes caused by rooms which are too empty.
Other than the environment, the mic is another factor to consider. At the basic level, you can use the phone’s built-in mic. It captures enough but of course, not everything. Thus, purchasing a mic might be a better option.
If you are doing solo filming, one type of microphone to be considered is Lavalier or Lapel microphones. It is attached to whoever you want to receive good audio from and are suitable for a one-man form of filming, e.g. interviews and vlogs.
Otherwise, there are a few other types of microphones meant for varying uses. Some popular ones are condenser, dynamic and shotgun microphones. These differ in the quality, range and direction of the audio captured.
This being said, you do not have to get the high-end mic. It ties back to the first factor we discussed, the filming environment, to decide which mic is a suitable one for you. The most important thing to note is to choose one that meets your needs and not choose the number one mic in the industry or those that have special functions catered to specific environments.
- Finding the Most Expressive Angle

Angulation defines the shots you are filming. It provides a point of focus for the viewers, depending on what or who the subject is. Providing a guide to perceive the scene displayed, viewers can follow your video better with a clear focus, now that they know where and what to look.
Commonly, the three popular angles are eye level, low angle and high angle shot. These are in reference to how the subject is being looked at, whether is it at the eye-level, upwards and downwards. Sometimes, angles portray the power relationship between characters, who is the superior one and the inferior one. While in other cases, angles are used for the perception of physical distances between the one in frame and their settings.
Therefore, different angulation creates different vibes for the viewers, as can be seen from the three photos provided above. Do consider the angles you want to film as it will affect the end product. Hence, this is another reason to predetermine how you want to appear to the viewers before setting up the camera.
Having multiple cameras is advantageous for editing as you can acquire shots from different angles simultaneously. It will be easier to create certain effects (e.g. zooming in and out) for your film without having to take the same scene again and again.
- Practicing with A Test Drive

Practice makes perfect and this extends to all the behind-the-scenes setup work that is completed prior to the actual filming. If you dive in head first without setting up properly, there is a high chance that you will not be satisfied with the end product.
Run through one or more test drives and check for everything mentioned above. Look out for the frames, lighting and audio (speak as you will in the actual film) and adjust till the frame looks just as what you wanted.
It is insufficient to watch and take on the styles of other professionals as everyone has different working styles. Experiment and understand what is best for you and what your preferences are to be able to produce something that satisfies you.


